Monday, November 25, 2013

CLOJUG - November 2013: Last meeting of the year

We run our regular JUG meeting on 23-NOV-2013 at a local pizzeria in Cali, Colombia. We decided to meet outside the classrooms in order to have a more easygoing and networking oriented meeting. It was a success, members of the CLOJUG started to talk each other about their roles, projects and, of course, Java. This was our last meeting in 2013, we hope to see you all again in JAN-2014.

Thanks to all our sponsors: Univalle, Unicesi, Oracle, PluralSight, Whizlabs, Codesa, O'reilly and Pack Publishing for their support during 2013.

Here are some pictures of this event:


Stay tuned for our events and if you live in Cali-Colombia, come to our meetings and become a member of our great community! http://www.clojug.org/

see ya!

Saturday, November 23, 2013

Using MySQL autoincrement PK column in ADF Entity PK attribute

Hello all. Continuing with the ADF + MySQL workaround series, today we are going to see what we need to do in order to use MySQL PK autoincrement columns with our ADF Entities PK attributes. If we were using Oracle database, we would use the oracle.jbo.domain.DBSequence along with a sequence and a trigger in order to do that out-of-the-box.

For simplicity, we are going to modify the Java file associated to the Entity, but as a good practice, you should have your own implementation of the oracle.jbo.server.EntityImpl class and configure JDeveloper so it uses your own implementation for every new Entity in your application. Check this post for more information about that.

This is not a step by step tutorial about how to create ADF BC from tables, we'll assume that you already have your Business Components definitions.

What you need
JDeveloper 12c
MySQL 5.5+


This is the database table that we are going to use in this post:

CREATE  TABLE `test`.`Actor` (
  `id_actor` INT NOT NULL AUTO_INCREMENT ,
  `name` VARCHAR(100) NOT NULL ,
  PRIMARY KEY (`id_actor`) );

Once you have created your entities from tables, JDeveloper will map your Entity attributes against the table columns and will set some properties based on the type of column. For example, for our PK column (id_actor), JDeveloper will set the attribute as a mandatory Integer and always updatable. We need to change that because we want our PK to be updatable while new (while creating a new instance) and not mandatory (because we are reading the autoincrement value after posting to the database):


You may have several tables in your database and hence several Entities in your ADF application but not all tables may have autoincrement PK columns, so we need a way to mark or identify when the Entity's PK attribute is coming from an autoincrement column in the database. We are going to do that using Property Set, which allows us to define a collection of key/values properties and then we can associate those properties to an attribute and access them during runtime:
  1. In JDeveloper select: File-->New-->From Gallery...

  2. In the ADF Business Components select Property Set


  3. Set the name and package of the new property set:


  4. Once created, we can define the set of key/value properties and if the properties are going to be shown to the users, we can even define them in translatable mode. This is not our case, so we are going to define a non-translatable property:


  5. Set the property name as AI (for AutoIncrement) and its value as true (because attributes who use this Property Set are coming from an autoincrement column):


  6. Now that we have our Property Set ready, we can use it in our Entity PK attribute:


In order to retrieve the autoincrement value for our PK attribute, we need to override the default implementation of our Entity class (remember we do this for simplicity, but you can do better as described at the beginning of this post). We can do that by implementing a Java class for our Entity and then by overriding the EntityImpl.doDML(int, TransactionEvent) method, which is where changes are posted to database:
  1. Go to the Java section of the Entity and click on the pencil icon:


  2. In the pop up window, select Generate Entity Object Class:... and click OK:


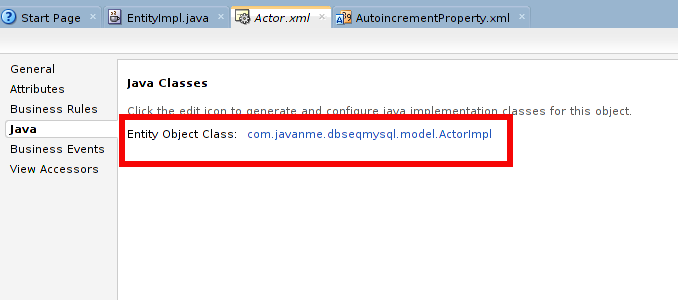
  3. The Java section of the Entity class now shows the Java file, click on the link to the Java File name:


  4. JDeveloper will open a new window with the Java code. Copy and paste the following methods:

    ...
        @Override
        protected void doDML(int i, TransactionEvent transactionEvent) {
            //got to call first to super, so the record is posted 
            //and we can then ask for the last insert id
            super.doDML(i, transactionEvent);
            
            //after the record is inserted, we can ask for the last insert id
            if (i == DML_INSERT) {
                populateAutoincrementAtt();
            }
        }
        
        /*
        * Determines if the Entity PK is marked as an autoincrement col
        * and executes a MySQL function to retrieve the last insert id
        */
        private void populateAutoincrementAtt() {
            EntityDefImpl entdef = this.getEntityDef();
            AttributeDef pk = null;
            //look for primary key with Autoincrement property set
            for (AttributeDef att : entdef.getAttributeDefs()) {
                if (att.isPrimaryKey() && (att.getProperty("AI") != null 
                    && new Boolean(att.getProperty("AI").toString()))) {
                    pk = att;
                    break;
                }
            }
            if (pk != null) {
                try (PreparedStatement stmt = 
                     this.getDBTransaction()
                         .createPreparedStatement("SELECT last_insert_id()", 1)) {
                    stmt.execute();
                    try (ResultSet rs = stmt.getResultSet()) {
                        if (rs.next()) {
                            setAttribute(pk.getName(), rs.getInt(1));
                        }
                    }
                } catch (SQLException e) {
                    e.printStackTrace();
                }
            }
        }
    ...
    

    The above code is posting changes to database and then asks whether we were inserting values. If that's the case, we need to retrieve the autoincrement value and set it in our PK attribute. Refer to the MySQL function LAST_INSERT_ID() for more information about retrieving autoincrement values.

OK, let's try out our solution. First, run your application module:


Once the Oracle ADF Model Tester tool appears, select (double click) the ActorView1 View Object, on the left panel, and click on the green plus sign icon, on the right panel,  in order to add a new Actor:


Enter a name for the Actor and press the "Save changes to the database" button (little database with the checklist icon on the toolbar):


You will notice that the autoincrement value is now set to the idActor attribute!

No need to be worried about concurrent inserts, MySQL documentation states that it is OK (check this documentation):

Using LAST_INSERT_ID() and AUTO_INCREMENT columns simultaneously from multiple clients is perfectly valid. Each client will receive the last inserted ID for the last statement that client executed.

Download the ADF project used in this post.


See ya!


References:

Vesterli E., Sten (2013). Developing Web Applications with Oracle ADF Essentials. United Kingdom: Packt Publishing Ltd.


MySQL 5.5 Reference Manual :: 12.14 Information Functions. MySQL [online].
Available on Internet: http://dev.mysql.com/doc/refman/5.5/en/information-functions.html#function_last-insert-id
[accessed on November 14 2013].


MySQL 5.5 Reference Manual :: 22.8.15.3 How to Get the Unique ID for the Last Inserted Row. MySQL [online].
Available on Internet: http://dev.mysql.com/doc/refman/5.5/en/getting-unique-id.html
[accessed on November 17 2013].

Friday, November 22, 2013

ADF Good Practice: Provide your own base classes

Hi all. I just wanted to share a really good practice when developing Oracle ADF applications. I have used this on several projects and it has always saved me time when I need to apply some new behavior to all my business components. Credits to Sten Vesterli for this best practice that I found on his book Oracle ADF Enterprise Application Development—Made Simple

When you are working with Business Components (Entities, ViewObjects, Application Modules, etc...) you are extending Oracle ADF base classes, the most common base classes are:
  • oracle.jbo.server.EntityImpl is used for your entities implementations
  • oracle.jbo.server.ViewObjectImpl and oracle.jbo.server.ViewRowImpl are used for your view object implementations
  • oracle.jbo.server.ApplicationModuleImpl is used for your application module implementations
So, what happens if after a few months of coding you need some new behavior in all your entities? If you are thinking in implementing a java class for every entity... you are making a bad decision for the future of your project.
What you need is to provide your own base classes and make sure that all your entities, view objects and application modules use your extended framework. And when changes arises, you can modify your base classes and then changes are applied to all your business components.

For example, when we create a new entity, by default we are getting:


But, when we are providing your own base classes, we will get something like this:


And all we need to do to apply a general change is to modify yourpackage.YourOwnBaseEnityImpl

At first, we will end up with empty classes, but don't worry, you are saving for the future ;-)

In order to create our own base classes framework, in JDeveloper we go to File-->New-->Application... Then, select Applications on the left panel and Custom Application on the right panel:


Select a name for the application and define an application package prefix (optional):


Then select a name for the project and make sure you select ADF Buiness Components as a project feature:


Check the source path and output directory and if everything is OK, press the Finish button:


Once the project has been created, make sure that the BC4J Runtime library has been added to the project properties:


Select the Libraries and Classpath option on the left pane. If there is no BC4J Runtime library already set in your project go to the Add Library option and look for it:


Now we can create our own base classes that extends from the Oracle ADF base classes. Go to: File-->New-->From Gallery...Then look for the General option on the left and select Java class on the right


Set the name for the base class and make sure to extend from Oracle ADF base classes, in the following example we are extending from oracle.jbo.server.EntityImpl:


Following are the most common base classes extended:

//change package according to your company 
package com.javanme.commons.framework;
/**
 * Base class for Applications Modules
 */
public class EntityImpl extends oracle.jbo.server.EntityImpl {
}


//change package according to your company 
package com.javanme.commons.framework;
/**
 * Base class for ViewObjects
 */
public class ViewObjectImpl extends oracle.jbo.server.ViewObjectImpl {
}


//change package according to your company 
package com.javanme.commons.framework;
/**
 * Base class for View Rows
 */
public class ViewRowImpl extends oracle.jbo.server.ViewRowImpl {
}


//change package according to your company 
package com.javanme.commons.framework;
/**
 * Base class for Applications Modules
 */
public class ApplicationModuleImpl extends oracle.jbo.server.ApplicationModuleImpl {
}


Once we have created all the base classes, we will need to create an ADF library in order to be able to use them in other projects. Right click on the project and select Project Properties... Then select the Deployment option on the left and click on the New button on the right. A dialog pops up, select ADF Library JAR File and set a name for this deployment:


Click OK twice since no more configurations are needed:


Then right click on your project and select Deploy-->YourADFLibDeployment from the pop up menu:


If this is the first time you are deploying the library, a new window pops up, just click on Finish. Then, go to the default deploy location of the project which is on {APP_DIR}/{PROJECT_DIR}/deploy, where APP_DIR and PROJECT_DIR are the paths defined when the application and the project were created:


Copy the library to a directory where you save all your libraries and then in JDeveloper go to Window menu and select Resources:


A new window, on the right,  appears on JDeveloper. Click on the folder icon and select IDE Connections then File System. We are going to define a new resource that points to the directory where we save all the libraries so we can easily add libraries to our projects:


Set a name for the resource and find the directory where the ADF libraries are saved, the one we created steps above. Finally, click on Test Connection in order to validate that everything is OK:


Once we have created the new resource, we can expand the tree below IDE Connections and look for the library that we want to import to the selected project. Right click and select Add to Project:


A confirm dialog pops up, just press Add Library:


You have to repeat the same steps for every library that you want to import into your project. Whenever we want the project to load changes on the imported libraries, right click on the project and select Refresh ADF ibrary Dependencies in {ProjectName}:


Last step is really important because we are telling JDeveloper that it needs to use our base classes instead of the Oracle ADF base classes. We can do this in two ways: the first one is at project level, so we need to configure every project where we want to use our base classes. The second approach is at JDeveloper level so every single project will make use of our base classes. It's up to you to decide which approach to take, but at the end we need to configure the following window:


Notice that we are using our own base classes which are at com.javanme.commons.framework package. If you want this at project level, then right click on the project and select Project Properties from the pop up menu. If you want this at JDeveloper level go to Tools-->Preferences. Whatever the approach is, look for the ADF Business Components/Base Classes in the pop up window.

This was a long post, hopefully it will save you time in your future ADF projects.

See ya!


References:

Vesterli E., Sten (2011). Oracle ADF Enterprise Application Development—Made Simple. United Kingdom: Packt Publishing Ltd.


Friday, November 15, 2013

Configuring MySQL for ADF development

Hi all. Today I'm going to show you how to configure MySQL database for Oracle ADF development.

IMHO when you are using ADF with other databases rather than Oracle DB you won't be able to use the full power of Oracle ADF and sometimes you'll find yourself looking for workarounds in order to achieve some behavior that with Oracle DB you get out-of-the-box. However, if your requirement is to use MySQL then you should make some configurations in order to use it with this framework. Also, you should check the JDeveloper and ADF certification matrix in order to be sure that the version of your MySQL server is certified. Following is the certification matrix for JDeveloper 12c and ADF: 


What you need
MySQL 5.5+
JDeveloper 12c

I'm running MySQL server on Ubuntu server 12.04 64bits, but I suppose that if you are running a windows system the configuration files should be similar. Refer to the Ubuntu official documentation on how to install MySQL on Ubuntu: https://help.ubuntu.com/12.04/serverguide/mysql.html


  1. Make sure you define a password for the MySQL root user, otherwise you may experience some errors when using MySQL and JDeveloper. You can define the root password during installation, but in case that you forgot to do so, try the following from MySQL manual:
    http://dev.mysql.com/doc/refman/5.5/en/resetting-permissions.html

  2. Since we want to work with Oracle ADF, we can configure MySQL database so it behaves similar to Oracle database. We can achieve that by using the sql-mode option. From MySQL manual:
    Server SQL modes define what SQL syntax MySQL should support and what kind of data validation checks it should perform. This makes it easier to use MySQL in different environments and to use MySQL together with other database servers.
    That said, we need to edit the my.cnf file, which in ubuntu is located at:

    /etc/mysql/my.cnf

    In a Windows system, you can find the file as my.ini at {INSTALL_DIR}/MySQL/data
    Open the file and change the line that starts with sql-mode= If there is not such line, you can add it under the [mysqld] section. Either case, make sure that the line is similar to:

    sql-mode="ORACLE"

    Then, you need to restart MySQL server. In order to do that, run the following commands in a terminal (in Windows, you should use the Windows service that was created when installing MySQL):

    sudo service mysql stop
    sudo service mysql start
    

    If you want to know what configurations are done when using the value ORACLE, visit the MySQL manual: http://dev.mysql.com/doc/refman/5.5/en/server-sql-mode.html#sqlmode_oracle

  3. When creating the database connection in JDeveloper, use the MySQL driver. Notice that once you select the driver, MySQL settings panel appears asking you for information regarding to your MySQL server:


  4. Last but not least, make sure that you use the proper SQL Platform and Data Type Map. For MySQL use SQL92 as the platform and Java for the Data Type Map. You have to do this configuration for every project that will start using Business Components:


That's it for today, with these configurations your MySQL will be ready for ADF. On next posts I'll be sharing workarounds that will help you take advantage of some ADF features on MySQL.

See ya!


References:

Vesterli E., Sten (2013). Developing Web Applications with Oracle ADF Essentials. United Kingdom: Packt Publishing Ltd.


MySQL 5.5 Reference Manual :: C.5.4.1 How to Reset the Root Password. MySQL [online].
Available on Internet: http://dev.mysql.com/doc/refman/5.5/en/resetting-permissions.html
[accessed on November 14 2013].


MySQL 5.5 Reference Manual :: 5.1.7 Server SQL Modes. MySQL [online].
Available on Internet: http://dev.mysql.com/doc/refman/5.5/en/server-sql-mode.html
[accessed on November 13 2013].

Thursday, November 7, 2013

CLOJUG - October 2013: JavaOne 2013 + Certification Panel

Hello all! This is a small update about what we did at the Cali (CLO) Java User Group - CLOJUG during Octuber 2013.

We have new sponsors: Packt Publishing is now offering books discounts to our members and some free eBooks for our meetings. Codesa is now offering location and speakers for our meetings. Whizlabs is now offering discounts for their certification preparation solutions to our members. Thanks to our new sponsors!

We run our regular meeting on 26-OCT-2013 at Universidad del Valle. We had the opportunity to learn about JavaOne 2013 why it is important to Java developers and some tips that may help you in case you decide to attend. Members were interested about the conference and all the technical content that you can access. By the way, JavaOne 2013 content is available on demand now, you can watch for free: https://blogs.oracle.com/javaone/entry/javaone_2013_sessions_online
    As requested by our members, we did a certification panel where Java Certified members of CLOJUG talked about how they prepare for certification, how is the certification process, how much is it costs, whether it is relevant for your career, etc. It was a fun session, thanks to Isaias Lopez from Codesa, Java Certified Professional, for attending and sharing his experience with us.

    We also run giveaways from our sponsors O'Reilly, Packt Publishing and Pluralsight - Hardcore Developer Training. They gave us books and free passes to access PluralSight's entire training library.

    Here are some pictures of this event:


    Stay tuned for our events and if you live in Cali-Colombia, come to our meetings and become a member of our great community! http://www.clojug.org/

    see ya

    Tuesday, November 5, 2013

    Book Review: Developing Web Applications with Oracle ADF Essentials

    Book cover from
    http://www.packtpub.com
    Oracle ADF is a framework for building Rich Web applications with Java which is built on top of Java EE. So if you have previous experience in building Web applications using JSF you are likely to start developing with Oracle ADF pretty fast. On the contrary, if you are just beginning with Web development, the visual and declarative development that this framework offers will let you build your applications in a fast pace.

    In this post, I'll be reviewing the book "Developing Web Applications with Oracle ADF Essentials" written by Sten E. Vesterli and published by PACKT. Although this book covers the 11.1.2.4.0 version, the concepts are the same as of the latest version (12.1.2.0.0 released a couple of months ago), it is a great book to get you started with Oracle ADF Essentials. The chapters are easy to read, they follow a tutorial approach and a summary at the end. You will learn what you need in order to build a Web application using a "free software" stack: JDeveloper IDE, ADF Essentials, Glassfish application server and MySQL database. This is an introductory book, so you won't find what every single property of the framework means, but it does have advance topics such as: how to configure ADF applications to be developed as shared libraries, how to implement security for an ADF Essentials application (remember ADF security is not part of ADF Essentials), among others.

    IMHO when you are using ADF Essentials with other databases rather than Oracle DB you won't be able to use the full power of ADF (or ADF Essentials) and sometimes you'll find yourself looking for workarounds in order to achieve some behavior that with Oracle DB you get out-of-the-box.

    From chapters 1 to 4 you will learn the basics of building an Orace ADF Essentials application and whenever there's a different behavior for using MySQL database, you'll get a tip or note clarifying this. You will also get several useful URLs pointing you to other sources of information. The chapters are tutorial like, you will be building an application with two use cases covering the core ADF Essentials technologies: Business Components for Java (BC4J) and ADF Faces.

    On chapters 5 to 8 is where you get the advance training. Building enterprise like applications requires changes in your application structure and this book teaches you how to do it and what you need to have in mind when building such applications. Another important feature is debugging and ADF has its own way to deal with it, the book shows you the way you can configure your application in order to enable debugging at different levels. I really liked that chapter 7 is about securing your ADF Essentials application but it was not only limited to using JAAS, you will learn how to configure and use the Apache Shiro security framework in order to address the lack of the security mechanism in ADF Essentials. Last but not least, you'll see how to configure ANT in order to automate your building process, this is pretty useful when you are working on big projects.

    Overall, I liked the book, learned new things and from now I'll try to blog about some ADF + MySQL workarounds that I have used in my projects.

    For more information about this book go to:

    http://www.packtpub.com/developing-web-applications-with-oracle-adf-essentials/book

    See ya!