Wednesday, November 28, 2012

JDeveloper 11gR2 and Java 7

Hello all. For an ADF Essentials application I'm working on I wanted to use the great set of new features introduced by Java 7, however JDeveloper 11gR2 (11.1.2.3) is not certified for JDK 7 so I had to look for help and found some tricks that let you use the new JDK.

This is what you need to do:
  1. Download and Install the new JDK. You can find the latest release using this link.
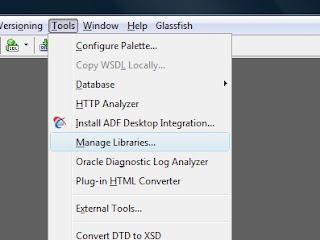
  2. Add the new JDK to JDeveloper's libraries: Tools -> Manage Libraries.
  3. Configure JDeveloper to run using the new JDK.
  4. Configure the Integrated Weblogic server to run using the new JDK.

The first step is pretty simple. Just go to that location, download the latest release of Java 7 and install it on your machine. In my case, I didn't have to create any environment variable for the JAVA_HOME or PATH, but your case may be different.

Open JDeveloper and go to the menu Tools and then open Manage Libraries:


The Manage Libraries dialog appears, select the title Java SE Definitions and then click on the button New... 


The Create Java SE dialog appears. For me, the Browse... button didn't work when trying to get in the Program Files directory, so I opened Windows Explorer and went to new JDK installation directory (for me it was: C:\Program Files\java\jdk1.7.0_09) then I copied the path from Windows Explorer and pasted it on the Java SE Executable inputText. I also added  \bin\java.exe


Notice that after you complete the path to the Java SE executable (\bin\java.exe), Jdeveloper will load the rest of the information. Hit the OK button to finish.

Now, JDeveloper comes with its own JDK and we need to change it for the new one you just installed. Close JDeveloper, open Windows Explorer and go to {ORACLE_HOME}\jdeveloper\jdev\bin where {ORACLE_HOME} is the directory you used when installing JDeveloper. There you will find a file called jdev.conf open it with a text editor and look for the entry SetJavaHome on line 31 (line numbers may differ in other versions of Jdeveloper), comment it and create a new SetJavaHome entry below that one, but this time use the new JDK installation folder:


What we just did tells JDeveloper to start with the new JDK. Now we need to configure the Integrated Weblogic server so it starts with the new JDK as well.

We need to find the value of the -Dide.pref.dir.base entry as described here:
http://www.java-n-me.com/2012/11/jdeveloper-11gr2-wont-start.html

In my case the value of the entry is: C:\Users\{MY_USER}\AppData\Roaming, where {MY_USER} is my user name, you may need to enable the "show hidden files" property of the Windows Explorer in order to be able to locate that directory. There,  look for the JDeveloper\system11.x.x.x.. directory where the x's are numbers. Open DefaultDomain\bin directory and edit setDomainEnv.cmd using a text editor:


Comment the line 45 and below that line set the SUN_JAVA_HOME property to point to the new JDK. Repeat the same procedure for the JAVA_HOME  property found at line 55 (line numbers may differ in other versions of Jdeveloper):


That's it, now JDeveloper and its Integrated Weblogic Server will use the new JDK. Open JDeveloper and go to Help->About->Version and you will notice that it is using the new JDK:


As I didn't want to keep using the old JDK I removed it from the Tools->Manage Libraries menu option so my new JDK become the Default JDK and all my new projects will be using Java 7:


I hope this workaround works for you as it did for me.

see ya!


References:

Using WebLogic Server with JDK 7. Oracle [online].
Available on Internet: http://docs.oracle.com/cd/E23943_01/doc.1111/e14142/jdk7.htm
[accessed on Novemeber 25th 2012].

Nick Aiva's blog! [online].
Available on Internet: http://nickaiva.blogspot.com/2011/04/jdeveloper-11g-setting-up-newest-java.html
[accessed on Novemeber 25th 2012].
Sunday, November 25, 2012

ADF Essentials Hackathon at RightHandCorp

Hello all, last saturday (24-Nov-2012) we had a lot of fun with the RightHandCorp's development team in their first ever ADF Essentials hackathon. We built a proof of concept for one of their in-house web application and the result was more than satisfactory. They were surprised about how easy it is to build great good looking enterprise applications using this framework. Used JDeveloper 11gR2, ADF Business components,  ADF Faces, Oracle Database and Glassfish server.


We had a great time, lot of networking and knowledge sharing. Looking forward for the next one.

see ya!

Sunday, November 11, 2012

JDeveloper 11gR2 won't start

Hello all, I just wanted to share with you a workaround to "restart" your JDeveloper 11gR2 (11.1.2.3) if it is not starting. I struggle with this for several hours, until I found some documentation that helped me out.

My case
  • JDeveloepr 11gR2 (11.1.2.3)
  • OS = Win Vista Sp2 
  • RAM= 4GB
  • Installation by default (C:\Oracle\Middleware).

I'm developing an ADF Essentials application and after updating some extensions my JDeveloper installation stopped working. I did several reinstallations and registry cleaning but nothing worked, JDeveloper just didn't start and it freezed when "Restoring Editors":


Fortunately, I found this blog: http://adfhowto.blogspot.in/2011/03/troubleshooting-jdeveloper-will-not.html which gives a tip about the JDeveloper preferences directory. What it says is that you can delete or modify the name of the JDeveloper preferences directory, and JDeveloper will create another one with default preferences. Something you should be aware of is that this procedure deletes all your preferences: SVN, extension preferences, general preferences...etc. So it's up to you.

The Solution
I decided that this procedure fitted my needs and started to search for that directory. There is an easy way to find the preferences directory:
  • Open a DOS terminal (cmd).
  • Go to your JDeveloper installation directory (in my case C:\Oracle\Middleware\jdeveloper\).
  • We need to execute the file jdev.exe which is in {JDEV_INSTALLATION_DIR}\jdev\bin
  • Type this command: jdev.exe -verbose
The previous procedure will try to start JDeveloper and will show all the steps required to do so. Look for the -Dide.pref.dir.base entry:


The final step is: go to that location and rename or delete (rename is better) the directory system11.x.x.x... for something else. Restart JDeveloper and it will start and create a new directory with default preferences.

I hope this post helps so you don't have to spend several hours trying to put JDeveloper to work.

see ya!

Friday, November 9, 2012

Java 7: File Filtering using NIO.2 - Part 3

Hello all. This is Part 3 of the File Filtering using NIO.2 series. For those of you who haven't read Part 1 or Part 2, here's a recap.

NIO.2 is a new API for I/O operations included in the JDK since Java 7. With this new API, you can perform the same operations performed with java.io plus a lot of great functionalities such as: Accessing file metadata and watching for directory changes, among others. Obviously, the java.io package is not going to disappear because of backward compatibility, but we are encouraged to start using NIO.2 for our new I/O requirements. In this post, we are going to see how easy it is to filter the contents of a directory using this API. There are 3 ways in order to do so, we already reviewed two similar ways in Part 1 and Part 2, but now we are going to see a more powerful approach.

What you need
NetBeans 7+ or any other IDE that supports Java 7

Filtering content of a directory is a common task in some applications and NIO.2 makes it really easy. The classes and Interfaces we are going to use are described next:
  • java.nio.file.Path: Interface whose objects may represent files or directories in a file system. It's like the java.io.File but in NIO.2. Whatever I/O operation you want to perform, you need an instance of this interface.
  • java.nio.file.DirectoryStream: Interface whose objects iterate over the content of a directory.
  • java.nio.file.DirectoryStream.filter<T>: A nested interface whose objects decide whether an element in a directory should be filtered or not.
  • java.nio.file.Files: Class with static methods that operates on files, directories, etc.

The way we are going to filter the contents of a directory is by using objects that implement the java.nio.file.DirectoryStream.filter<T> interface. This interface declares only one method +accept(T):boolean which as the JavaDoc says: "returns true if the directory entry should be accepted". So it's up to you to implement this method and decide whether a directory entry should be accepted based on whatever attribute you want to use: by hidden, by size, by owner, by creation date, etc. This is important to remember, using this method you are no longer tied to filter only by name, you can use any other attribute.

If you only want directories, you can use the java.nio.file.Files class and its +isDirectory(Path, LinkOption...):boolean method when creating the filter:

//in a class...

    /**
     * Creates a filter for directories only
     * @return Object which implements DirectoryStream.Filter
     * interface and that accepts directories only.
     */
    public static DirectoryStream.Filter<Path> 
                                 getDirectoriesFilter() {

        DirectoryStream.Filter<Path> filter = 
                           new DirectoryStream.Filter<Path>() {

            @Override
            public boolean accept(Path entry) throws IOException 
            {
                return Files.isDirectory(entry);
            }
        };

        return filter;
    }


Or if you only want hidden files, you can use the java.nio.file.Files class and its +isHidden(Path):boolean method when creating the filter:

//in a class...

    /**
     * Creates a filter for hidden files only
     * @return Object which implements DirectoryStream.Filter
     * interface and that accepts hidden files only.
     */
    public static DirectoryStream.Filter<Path> 
                                 getHiddenFilesFilter() {

        DirectoryStream.Filter<Path> filter = 
                           new DirectoryStream.Filter<Path>() {

            @Override
            public boolean accept(Path entry) throws IOException 
            {
                return Files.isHidden(entry);
            }
        };

        return filter;
    }


Or if you want files belonging to a specific user, you have to ask for a user and compare it with the owner of the directory entry. To obtain the owner of a directory entry, you can use the java.nio.file.Files class and its +getOwner(Path, LinkOption...):UserPrincipal method (watch out, not all OS support this).
To obtain a specific user on the filesystem use the java.nio.file.FileSystem class and its +getUserPrincipalLookupService():

//in a class...

    /**
     * Creates a filter for owners
     * @return Object which implements DirectoryStream.Filter
     * interface and that accepts files that belongs to the 
     * owner passed as parameter.
     */
    public static DirectoryStream.Filter<Path> 
          getOwnersFilter(String ownerName) throws IOException{

        UserPrincipalLookupService lookup = FileSystems.getDefault().getUserPrincipalLookupService();

        final UserPrincipal me = 
                    lookup.lookupPrincipalByName(ownerName);

        DirectoryStream.Filter<Path> filter = 
                           new DirectoryStream.Filter<Path>() {

            @Override
            public boolean accept(Path entry) throws IOException 
            {
                return Files.getOwner(entry).equals(me);
            }
        };

        return filter;
    }


The following piece of code defines a method which scans a directory using any of the previous filters:

//in a class...
    
    /**
     * Scans the directory using the filter passed as parameter.
     * @param folder directory to scan
     * @param filter Object which decides whether a 
     * directory entry should be accepted
     */
    private static void scan(String folder
                           , DirectoryStream.Filter<Path> filter) 
    {
        //obtains the Images directory in the app directory
        Path dir = Paths.get(folder);
        //the Files class offers methods for validation
        if (!Files.exists(dir) || !Files.isDirectory(dir)) {
            System.out.println("No such directory!");
            return;
        }
        //validate the filter
        if (filter == null) {
            System.out.println("Please provide a filter.");
            return;
        }

        //Try with resources... so nice!
        try (DirectoryStream<Path> ds = 
                      Files.newDirectoryStream(dir, filter)) {
            //iterate over the filtered content of the directory 
            int count = 0;
            for (Path path : ds) {
                System.out.println(path.getFileName());
                count++;
            }
            System.out.println();
            System.out.printf(
                     "%d entries were accepted\n", count);
        } catch (IOException ex) {
            ex.printStackTrace();
        }
    }

We can execute the previous code passing the following parameters to the main method (check the source code at the end of this post):

  • Directory to scan: C:\ or / dependening on your OS. 
  • Filter: hidden

When executing the code we get the following:


In a windows machine, you can obtain the hidden files using the command: dir /AAH Notice that we are getting the same result:


And on my Linux virtual machine:


Using the command ls -ald .* we get similar results:


Again, Write once, run everywhere!

I hope you enjoyed the File Filtering using NIO.2 series. One last word, all the filtering methods we reviewed worked on one directory only, if you want to scan a complete tree of directories, you'll have to make use of the java.nio.file.SimpleFileVisitor class.


Click here to download the source code of this post.


See ya!

References:

Reese Richard and Reese Jennifer (2012). Java 7 New Features Cookbook. United Kingdom: Packt Publishing Ltd.

Thursday, November 1, 2012

Duke's Choice Awards 2012 LAD nomination extended

Just to let you know, the nominations for the Duke's Choice Awards 2012 LAD has been extended, the new final date is Novemeber 7th, 2012.

The program looks for the most compelling implementations of Java technology. Innovation is the only criteria. The nomination form can be found on the Duke's Choice Java.net site


Winners will be announced on stage during JavaOne LAD (Brasil) December 4th through 6th, and will also be featured in the January/February issue of Java Magazine. Winners will receive a free JavaOne LAD full conference pass and a Duke's Choice Award Statue.

So, you are in Latin America (LAD) and have an innovative Java project? what are you waiting for? Remember the end date for nominations is November 07th, 2012.

Don't you know if you got what it takes? Check the 2011 winners (when there was only one global program).


see ya!